Guide to Pointing a Domain with Proxy Project on aaPanel
Proxy Project in aaPanel is used to create a reverse proxy for a domain name. This method is commonly used when your website/app is running on an internal port, for example:
http://127.0.0.1:3000
http://127.0.0.1:4099
http://localhost:8000
After configuring the Proxy Project, users only need to access the domain name such as:
https://yourdomain.com
aaPanel/Nginx will automatically forward the request to the application running behind it.
1. Preparation before configuration
Before creating a Proxy Project, you need to prepare:
Domain name
Example:
yourdomain.com
www.yourdomain.com
This domain needs to have its DNS pointed to the IP address of the server where aaPanel is installed.
Example DNS records:
| Type | Name | Value |
|---|---|---|
| A | @ | Server IP |
| A | www | Server IP |
If you use Cloudflare, you can enable or disable the orange cloud proxy depending on your needs. When configuring SSL for the first time, if you encounter verification errors, you should temporarily switch to DNS Only first.
The backend application is running
For example, a Node.js/Next.js app is running at:
http://127.0.0.1:3000
You should check it first with the command:
curl http://127.0.0.1:3000
If it returns HTML or website content, it means the app is running properly.
2. Create a Proxy Project in aaPanel
In aaPanel, go to the website management or reverse proxy section, then select:
Add proxy
Then fill in the information as follows.
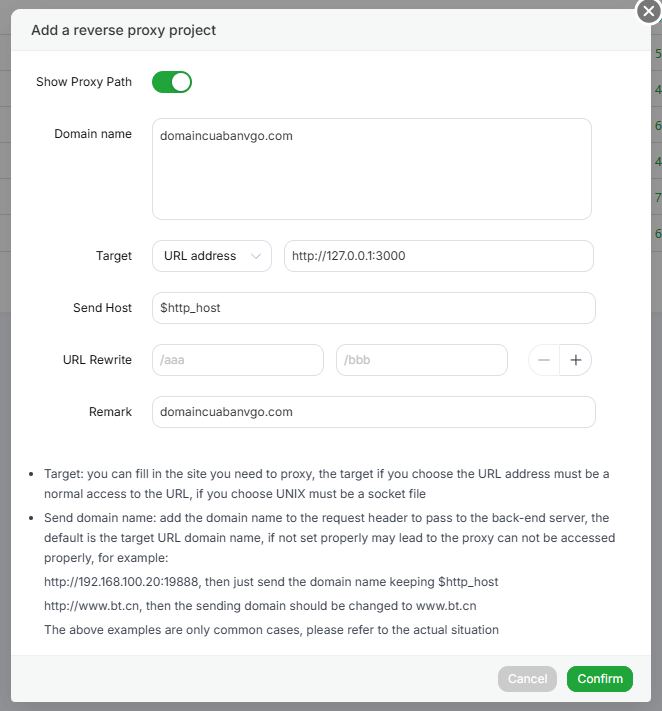
3. Configure Domain Name
In the Domain name field, enter the domain you want to run through the proxy.
Example:
yourdomain.com
If you also want to use www, you can add both:
yourdomain.com
www.yourdomain.com
Depending on the aaPanel interface, each domain may need to be entered on a separate line.
4. Configure Target
In the Target section, select the type:
URL address
Then enter the backend application address.
Example:
http://127.0.0.1:3000
Meaning:
yourdomain.com → aaPanel/Nginx → http://127.0.0.1:3000
When users access the domain, aaPanel will forward the request to the app running on port 3000.
Some common Target examples:
http://127.0.0.1:3000
http://127.0.0.1:4099
http://localhost:8000
http://192.168.1.10:8080
5. Configure Send Host
In the Send Host section, you should keep the default value:
$http_host
This value helps aaPanel send the correct original host/domain to the backend.
For example, when a user accesses:
https://yourdomain.com
The backend will receive the host as:
yourdomain.com
This is very important for apps such as Next.js, Laravel, WordPress, API Gateway, or systems that need to identify the domain.
You should only change Send Host when you clearly understand which specific host the backend needs to receive.
6. Configure URL Rewrite
The URL Rewrite section is used to rewrite the path before proxying it to the backend.
Example:
/aaa → /bbb
If you do not need to rewrite URLs, you can leave it blank.
Normally, for a website/app running on the full domain, you do not need to configure this section.
7. Configure Remark
In the Remark field, you can enter a note for easier management.
Example:
yourdomain.com
Next.js app port 3000
Proxy frontend website
Then click:
Confirm
to create the Proxy Project.
8. Test the website after creating the Proxy
After creating it, try accessing:
http://yourdomain.com
If the configuration is correct, the website will display content from the app running at:
http://127.0.0.1:3000
If it does not work yet, you need to check:
curl http://127.0.0.1:3000
Check whether the app is running:
pm2 list
or:
netstat -tulpn | grep 3000
9. Enable SSL for the domain
After the Proxy Project works over HTTP, the next step is to enable SSL so the website runs over HTTPS.
In aaPanel, go to the site/proxy project management section and select the tab:
SSL
Then select:
Let's Encrypt
or if you already have a certificate, use:
Other certificate
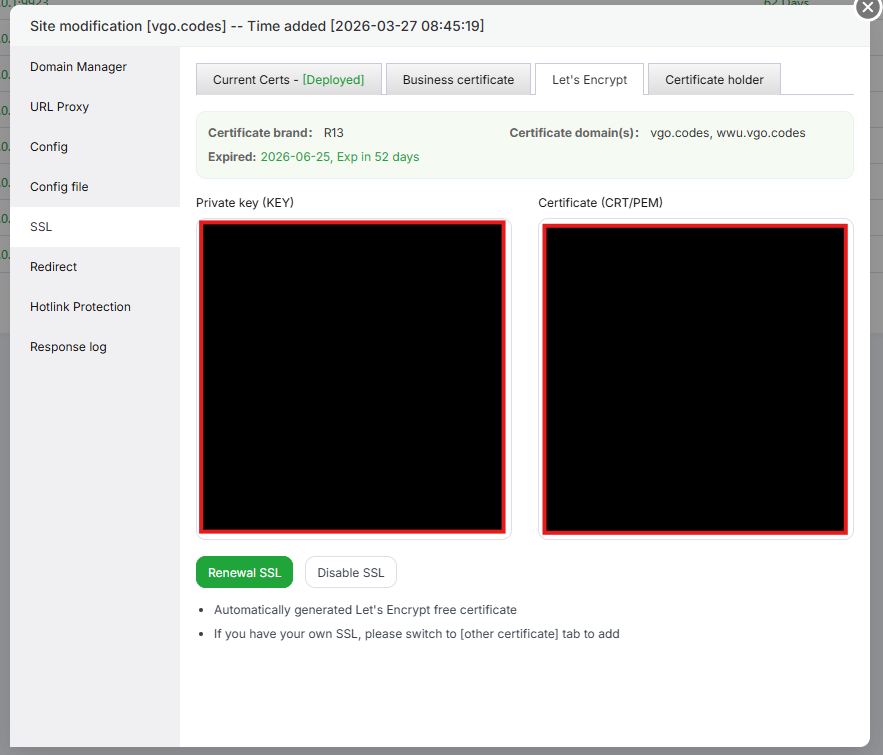
10. Issue a Let's Encrypt certificate
In the SSL tab, aaPanel will display information such as:
Certificate brand: R13
Certificate domain(s): yourdomain.com, www.yourdomain.com
Expired: yyyy-mm-dd
If SSL has not been issued yet, click:
Apply SSL
or:
Renew SSL
if you want to renew the certificate.
After it is issued successfully, the status will show:
Deployed
At this point, the website can be accessed via:
https://yourdomain.com
11. Notes when issuing SSL
For Let's Encrypt to issue SSL successfully, make sure that:
The domain has been pointed to the correct server IP.
Ports 80 and 443 are open.
The website/proxy project already exists in aaPanel.
If you use Cloudflare, SSL/TLS should be set to:
Full
or:
Full (strict)
after SSL on the server is working properly.
If the orange Cloudflare proxy is enabled and SSL issuance fails, try switching DNS to:
DNS Only
then issue SSL again.
12. Complete configuration example
Assume you have a Next.js app running at:
http://127.0.0.1:3000
You want to access it using the domain:
yourdomain.com
Configure the Proxy Project as follows:
| Item | Value |
|---|---|
| Domain name | yourdomain.com |
| Target type | URL address |
| Target | http://127.0.0.1:3000 |
| Send Host | $http_host |
| URL Rewrite | Leave blank if not needed |
| Remark | yourdomain.com |
Then enable SSL in the SSL tab and issue a Let's Encrypt certificate.
Result:
https://yourdomain.com
will proxy to:
http://127.0.0.1:3000
13. Some common errors
502 Bad Gateway error
Common causes:
The backend is not running.
The port is incorrect.
The app only listens on localhost but the configuration is incorrect.
The firewall is blocking the internal port.
Check with:
curl http://127.0.0.1:3000
If this command fails, you need to restart the app first.
SSL cannot be issued
Common causes:
The domain has not been pointed to the correct IP.
Port 80 is blocked.
Cloudflare proxy causes verification errors.
The site/proxy project has not been created correctly.
You can check DNS with:
ping yourdomain.com
or:
nslookup yourdomain.com
Website redirects to the wrong domain
The cause may be an incorrect Send Host configuration.
You should keep:
$http_host
so the backend receives the correct domain that the user is accessing.
Website loads but CSS/JS is missing
This is usually caused by an incorrect app build base path, asset path, or rewrite configuration.
If you proxy the full domain, the URL Rewrite section should be left blank.
14. Conclusion
Proxy Project in aaPanel is a simple way to expose an internal application such as Node.js, Next.js, React, Laravel, API service, or CMS to the public using a real domain name.
The basic process includes:
Point DNS to the server
→ Create a Proxy Project
→ Enter the Domain name
→ Enter the backend Target
→ Keep Send Host as $http_host
→ Enable Let's Encrypt SSL
→ Access the website via HTTPS
With the correct configuration, you can run multiple websites/apps on the same server, with each app using its own domain and proxying to a different internal port.